Exploring the World of Custom Content Types for Surveys with JetFormBuilder
In today’s blog post, we’re going to dive deep into the process of building captivating surveys using the incredible JetFormBuilder plugin. If you’ve been following my previous video, you’re already familiar with how we crafted a nifty formula to calculate averages. Today, we’re taking it up a notch by delving into the realm of Custom Content Types (CCT) to elegantly store and manage user responses from our surveys.
Why Opt for Simplicity with Custom Content Types (CCT):
As we embark on this journey, you might wonder why we’re leaning towards Custom Content Types (CCT) instead of the more elaborate Custom Post Types (CPT). The answer is quite simple: we’re keeping things streamlined to meet our specific needs. Our aim is to create a dedicated space to house survey responses without the burden of unnecessary complexities. Drawing inspiration from a previous project, I’ve witnessed firsthand the power of CCTs in generating insightful reports while maintaining a cleaner data storage system. With this in mind, let’s roll up our sleeves and get started on crafting our very own CCT.
Embarking on the CCT Adventure:
To kick things off, head over to the Jet Engine plugin and activate the custom content types feature. As soon as it’s enabled, you’ll spot a shiny new addition in the sidebar titled “Custom Content Types.” This is where the magic happens. In this space, we’ll begin constructing our CCT masterpiece, christened “Survey Logs.” While the default format is functional, don’t hesitate to sprinkle some customization magic. I personally opted for a “doc” menu icon and stuck with the default menu position before moving on to the thrilling part – defining the essential fields.
Laying the Foundation with Essential Fields:
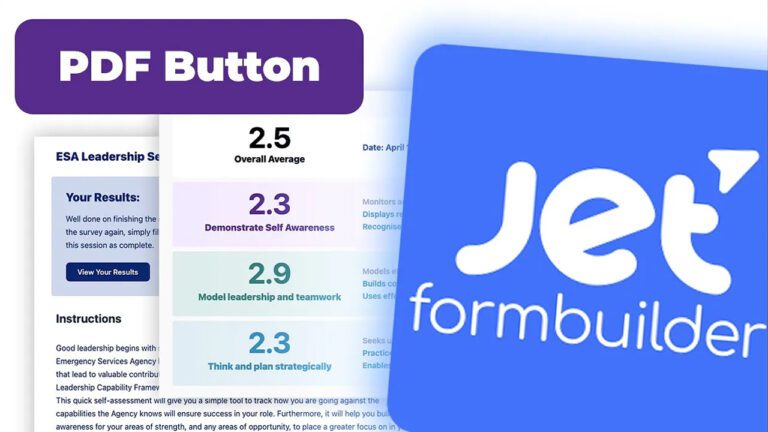
The core fields we’re including are the ever-present “item id,” “item author,” and “creator date.” These act as our survey’s backbone. However, to truly capture the essence of the survey’s questions, we’ve incorporated fields such as “average one,” “average two,” “average three,” and the all-encompassing “overall average.” These additions are in perfect harmony with our survey’s structure. Once our field orchestra is complete, you’ll proudly see the “CCT Survey Logs” standing tall in your custom post type section.
Fine-Tuning with Specific Fields:
Don’t rush off just yet! Returning to the custom content types section, let’s add a sprinkle of finesse by creating fields that align seamlessly with the nuances of our survey. Our focus shifts towards “average one,” “average two,” “average three,” and the trusty “overall average.” While it’s tempting to dive into a world of endless possibilities, we’re keeping it elegant and straightforward for this showcase. This touch elevates the comprehensiveness of our custom post type section, paving the way for the next steps.
Navigating Post-Submit Actions and Redirection:
Now, let’s step into the survey form itself. Here, it’s imperative to establish post-submit actions that gracefully integrate with our CCT. We’re replacing existing options with a custom “post submit” action. The selection? “Insert Update Post.” A tiny adjustment, though – remember to shift from CPT to CCT to ensure a harmonious fit with our goals. After a quick page refresh, voilà, the correct option reveals itself.
With this framework in place, it’s time to forge the link between the CCT “Survey Logs” and the corresponding survey data fields, averages, and all. To add a dash of finesse, we’re setting up a redirection to a results page post-submission. As you stride through the form, entering survey responses like a pro, the CCT masterfully stores the data. It’s a sight to behold, capturing even the elusive decimals for a crystal-clear picture.
Precision in Data Representation:
Speaking of decimals, let’s ensure our data representation is flawless. By tweaking field types, we’re accommodating those crucial decimal points. These thoughtful adjustments solidify the CCT’s prowess in capturing and storing survey responses with remarkable accuracy. With this dynamic process validated, we’re ready to set our sights on crafting a Jet listing and refining the results page layout in the upcoming chapters.
Wrapping Up the Survey Odyssey:
In closing, this blog post has journeyed through the realm of creating Custom Content Types to expertly manage and store survey responses using JetFormBuilder. As I conclude, I want to emphasize that WP Membership Designs stands as a reliable companion for navigating the intricate landscapes of WordPress membership site management. Don’t hesitate to reach out with questions or curiosities; your feedback fuels the learning journey. I’m excited to embark on the next chapter, sharing more insights and experiences in the ever-evolving world of WordPress. Until next time, happy designing!